Skip to content

Apstra Device Replacement

Bill Wester - 10/05/2023

An essential operation in a working data center network would be the need to replace a device that has either failed or just needs to be re-allocated/reused for other purposes. This document describes the steps needed to accomplish this task via the Apstra UI and the Apstra Terraform Provider.

Note that we did not have physical hardware to perform this operation in our test environment.

High Level Steps Required

Conceptually replacing a device for any reason in Apstra is a straight forward set of tasks. Devices are abstracted from their role in the fabric by the use of Logical Devices and Interface Maps and are assigned to a blueprint. In this use case we are expecting the replacement device to be exactly the same physically (ie. make, model and port configuration) as the replaced device.

GUI Method Deletion of leaf2 with Still Connected Device

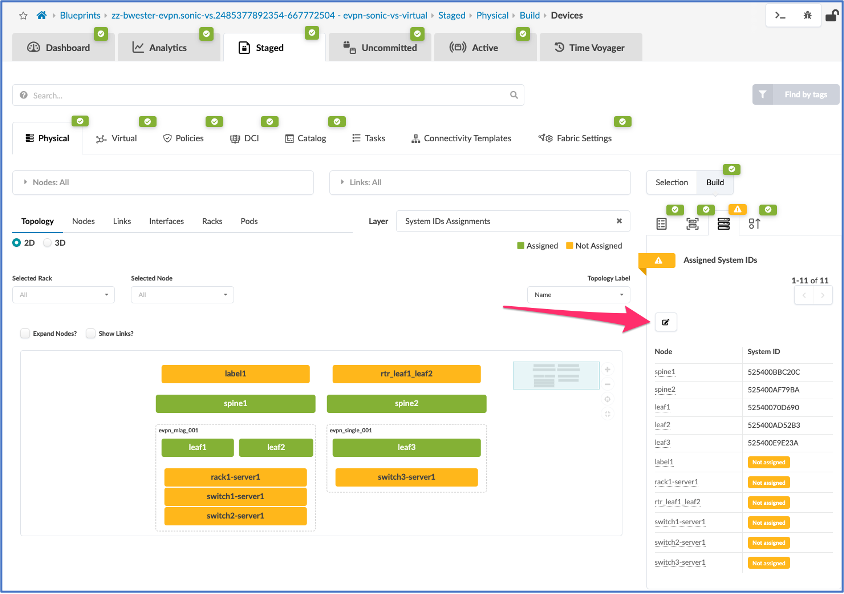
  1. Navigate via the Apstra UI to Blueprints -> blueprint_ID -> staged -> Physical -> Build -> Devices and use the edit pencil to "Change system ID Assignments"
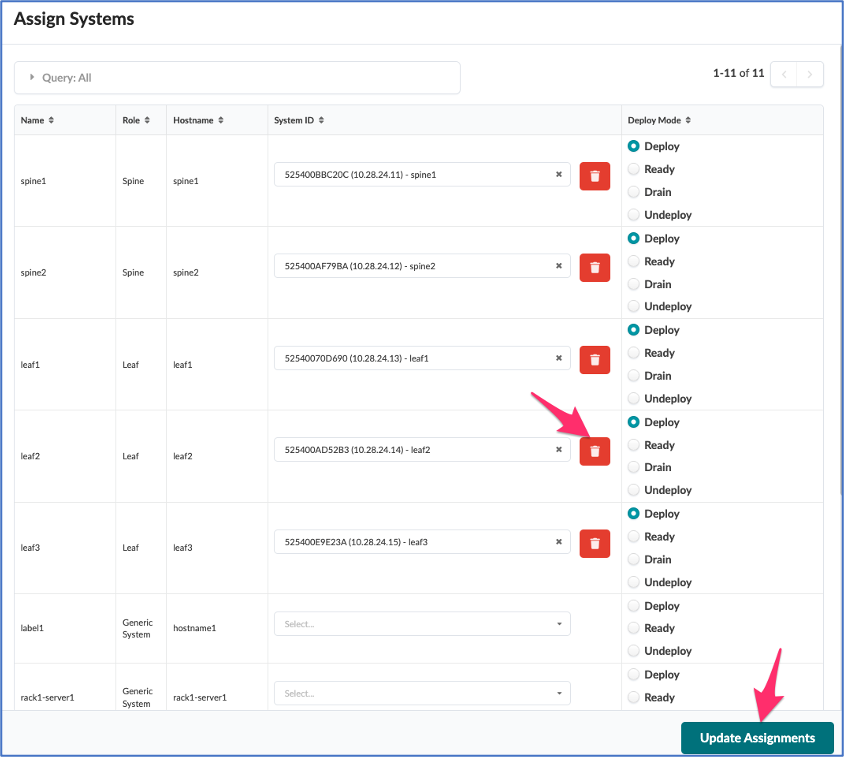
  1. We will choose to work with the leaf2 device. Delete the leaf2 assignment by selecting the trashcan icon.

  2. Now choose the 'Update Assignment' selection.
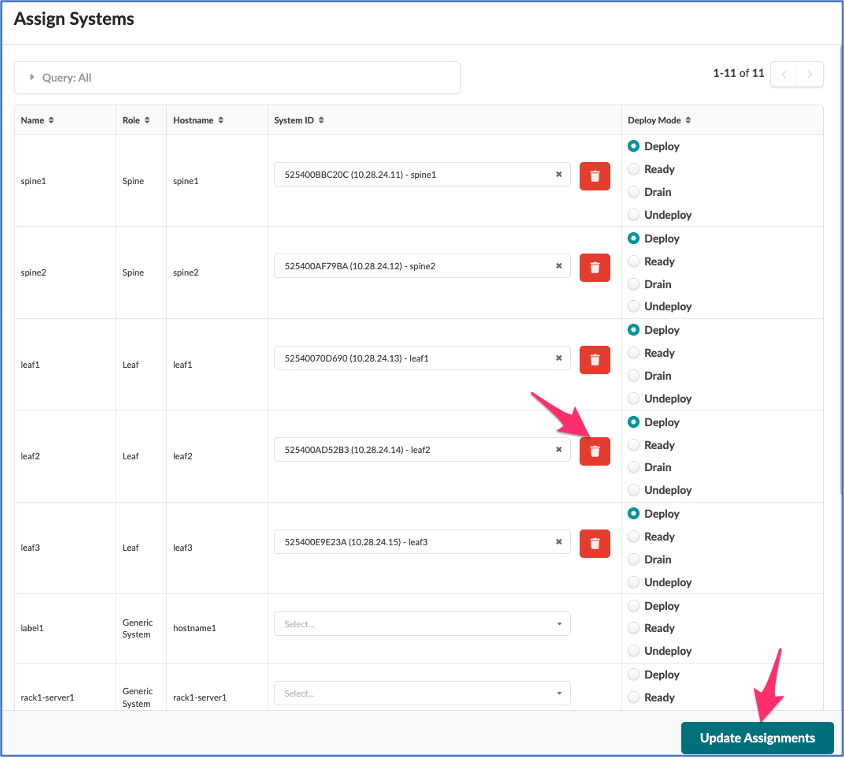
Here we can see the leaf2 is no longer assigned:
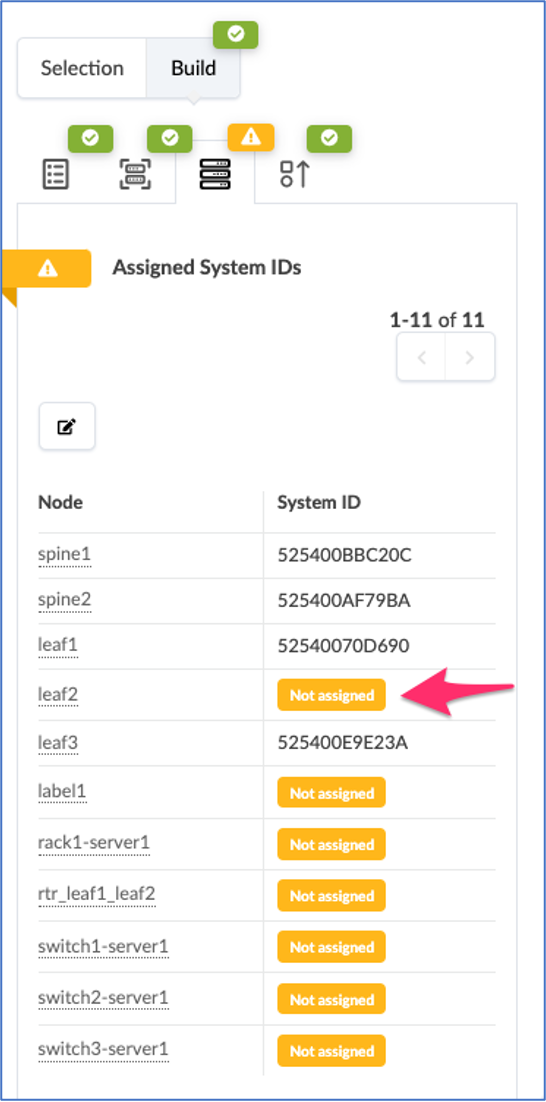
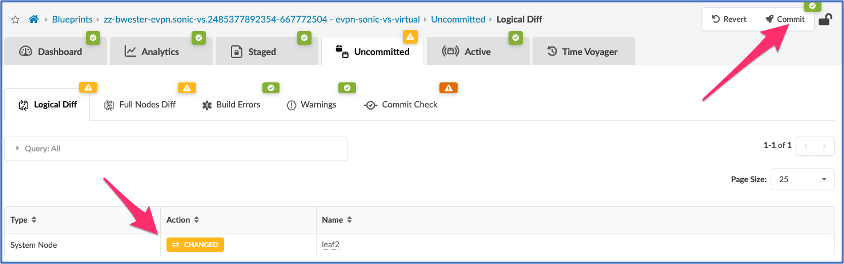
  1. Commit the change to the system, navigate to Blueprint-> blueprintID -> Uncommitted -> and click the "Commit" rocket icon:
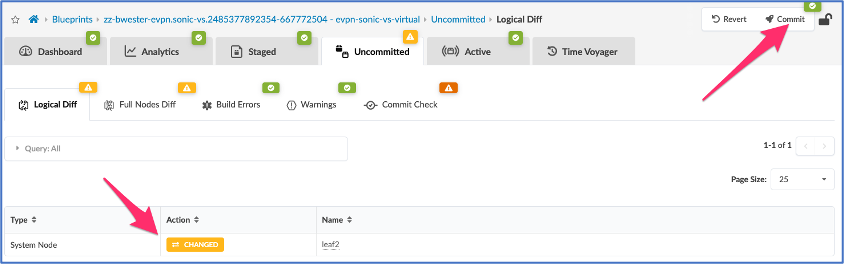
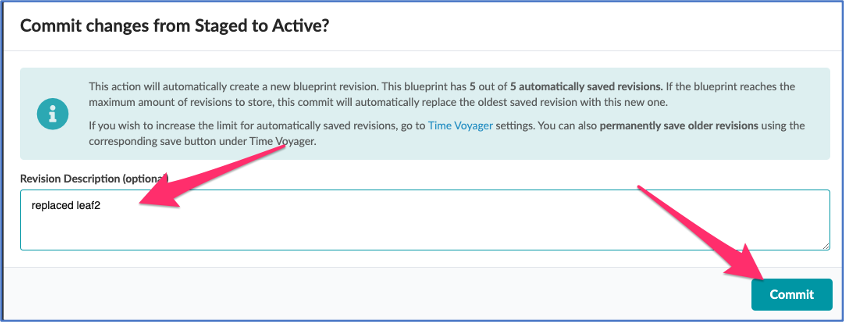
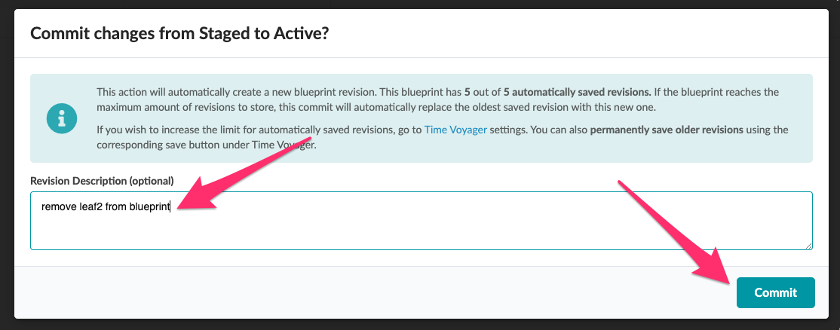
You should then add a comment and complete the commit:
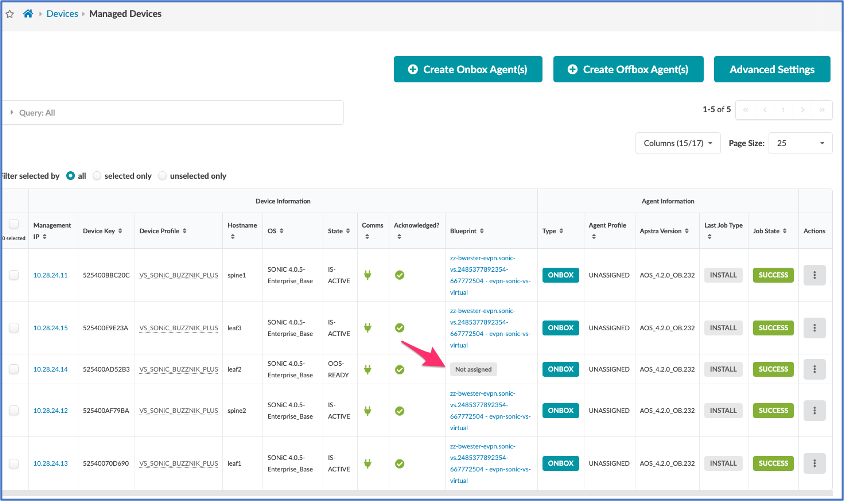
  1. Once the commit is complete, navigate to Devices -> Managed Devices and you should now see that leaf2 is unassigned from the blueprint:
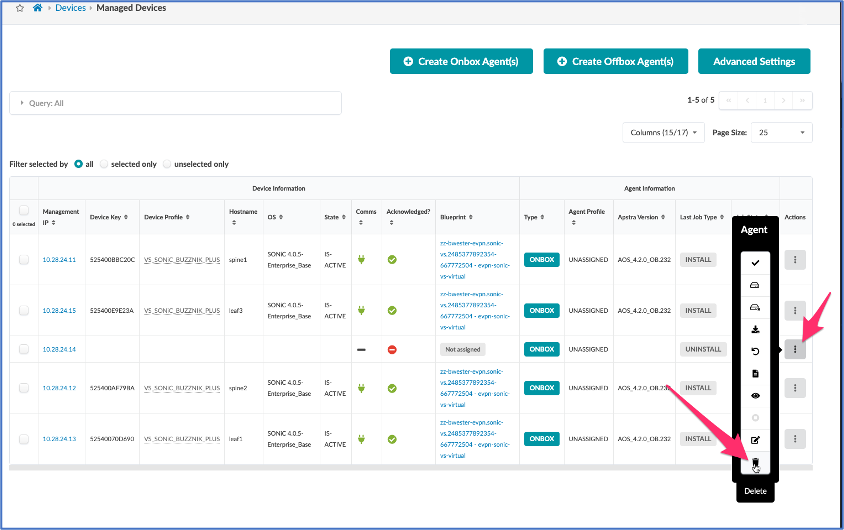
  1. Now we can uninstall the agent from the device. Navigate to Devices -> Managed devices and you should be able to select the correct device (10.28.24.14 in this example) Check the box next to the device and then click the uninstall icon:
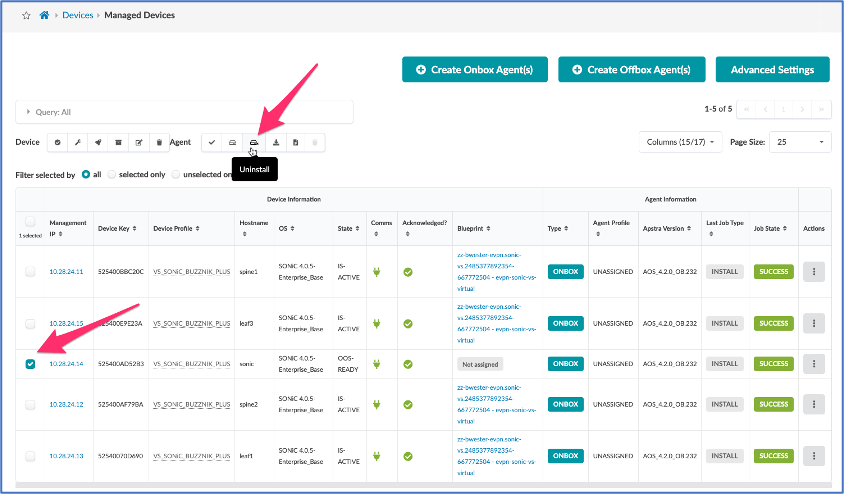
This then should generate another popup confirmation:
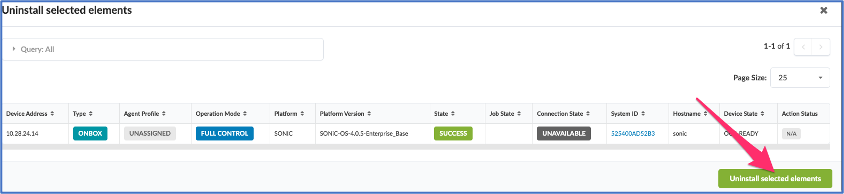
  1. Once this task completes you should observe the state for leaf2 is oos-nocomms and a red x in the 'comms' column:
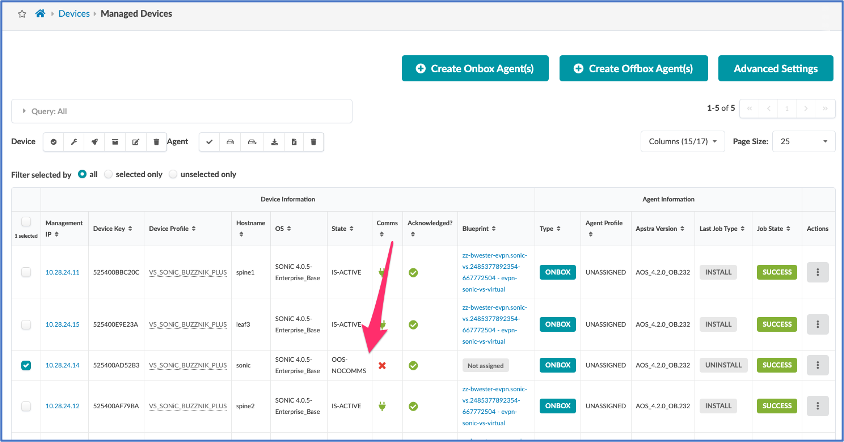
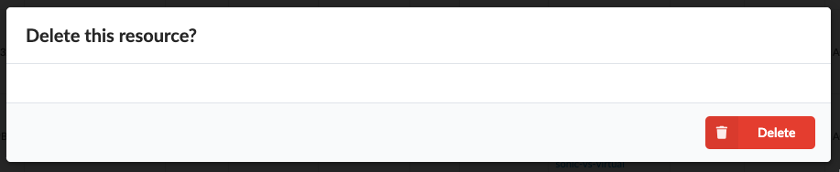
  1. Delete the device completely from Apstra by selecting the device and clicking the trashcan icon:
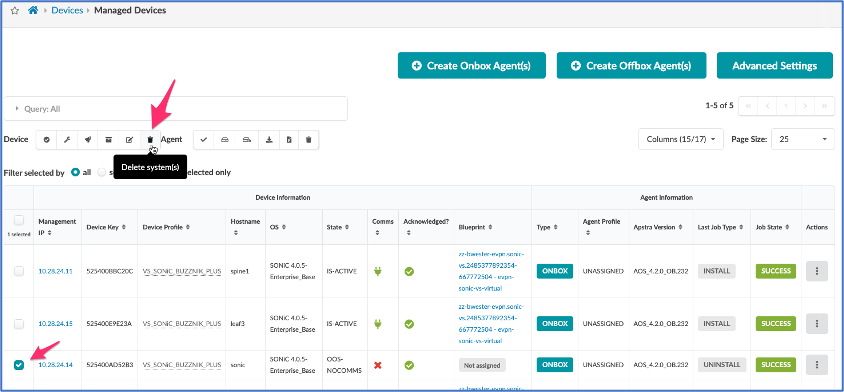
  1. Delete the system agent for the device by selecting the vertical ... icon:
GUI Method deletion of a failed or not responding Device

For this procedure we have a device that has failed, and is no longer communicating with Apstra.

  1. Navigate via the Apstra UI to Blueprints -> blueprint_ID -> staged -> Physical -> Build -> Devices and use the edit pencil to "Change system ID Assignments".
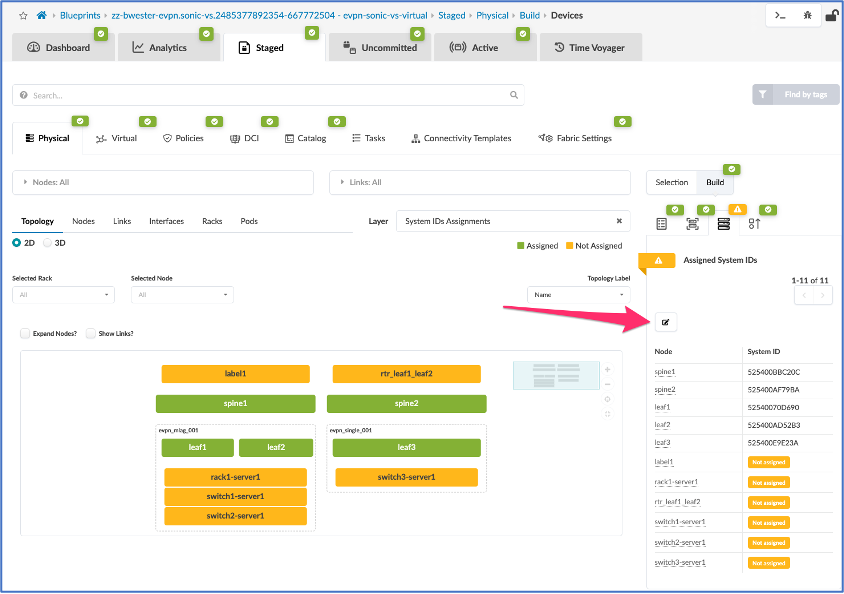
  1. Delete the leaf2 assignment by selecting the trashcan icon.

  2. Now choose the 'Update Assignment' selection.
  1. Commit the change to the system, navigate to Blueprint-> blueprintID -> Uncommitted -> and click the "Commit" rocket icon:
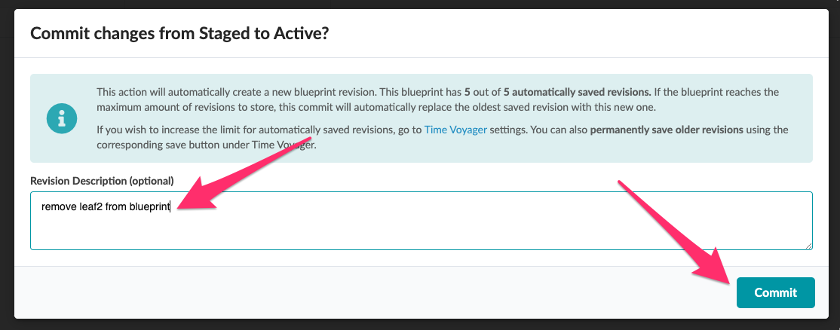
You should then add a comment and complete the commit:
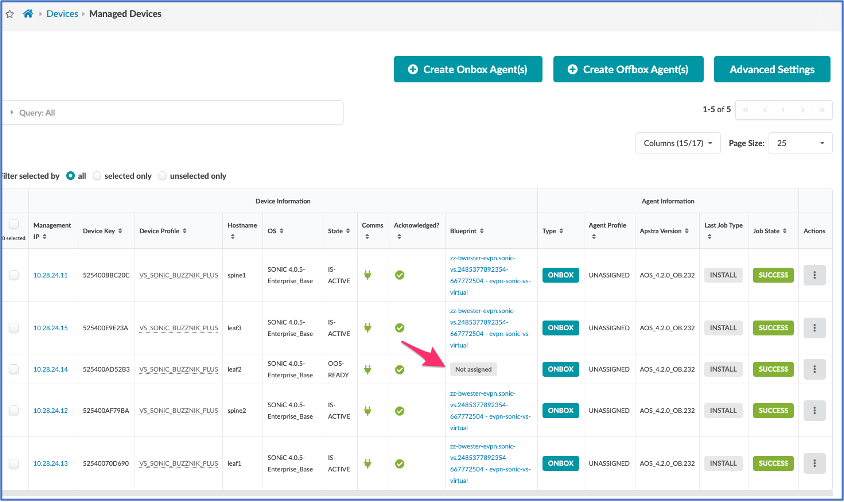
  1. Once the commit is complete, navigate to Devices -> Managed Devices and you should now see that leaf2 is unassigned from the blueprint:
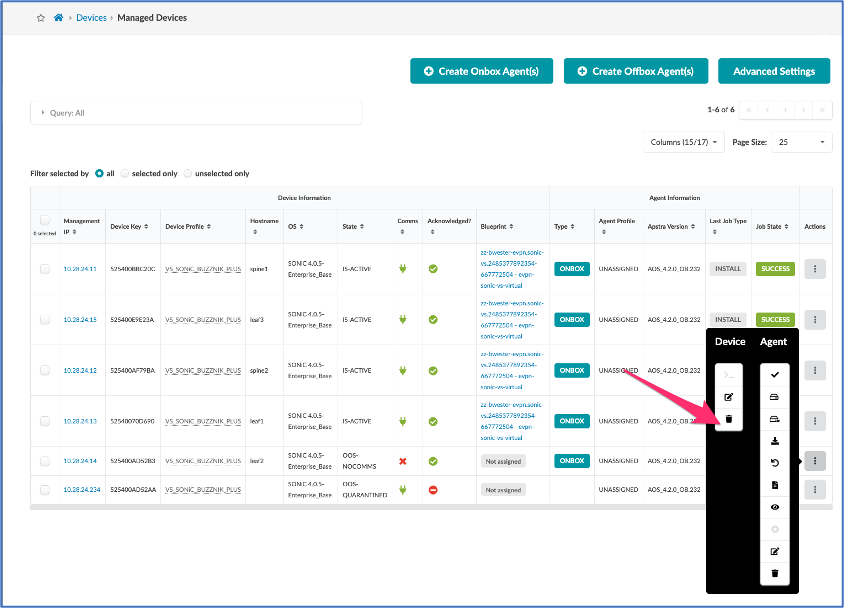
  1. Remove the failed leaf2 device from the Managed Devices list.
  1. Confirm the deletion dialog.

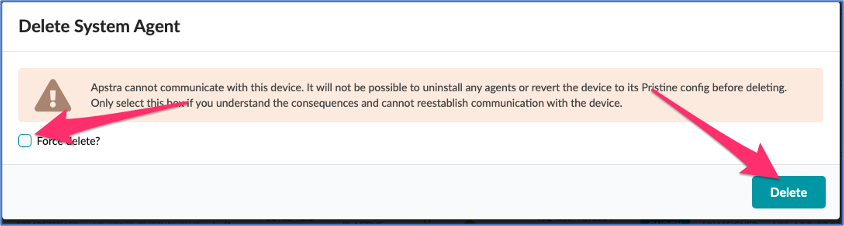
  1. Remove the agent from the failed leaf2 device.
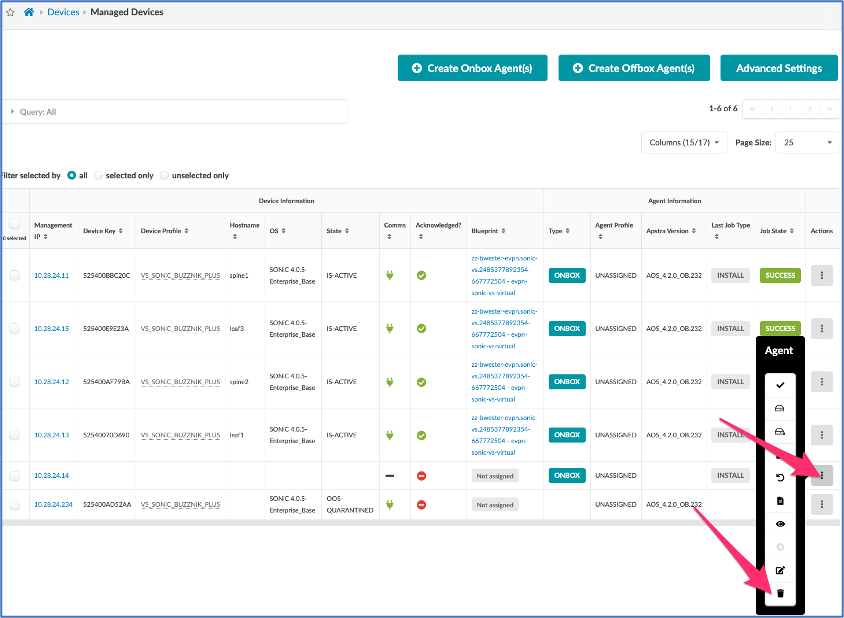
  1. Confirm the deletion dialog and force the deletion:
GUI Method to add the replacement device

Let's now take a look at what would be required to replace the device back into the blueprint.

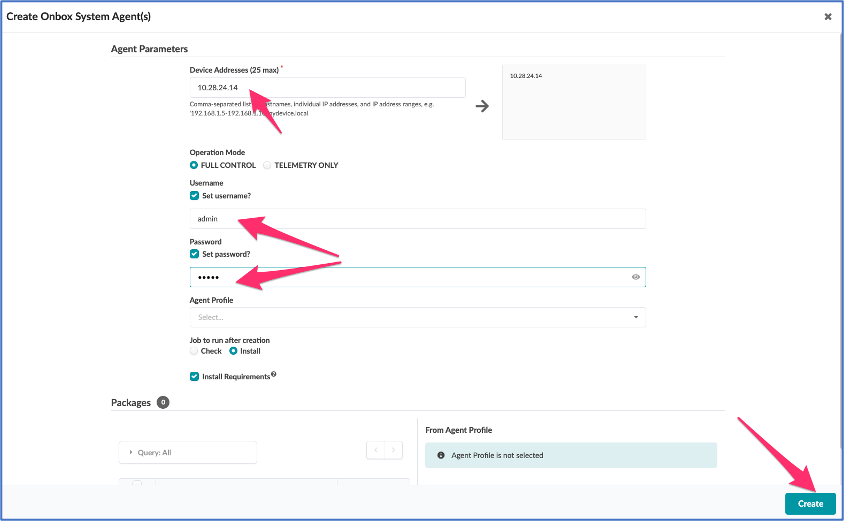
  1. First step is to add the device to Managed Devices. If the device already exists, in Managed Devices you can skip this step. Navigate to Devices -> Managed Devices, and select the "Create Onbox Agents" Icon (SONIC devices use Onbox Agents). You will need to fill in the IP address and Username / Password information:
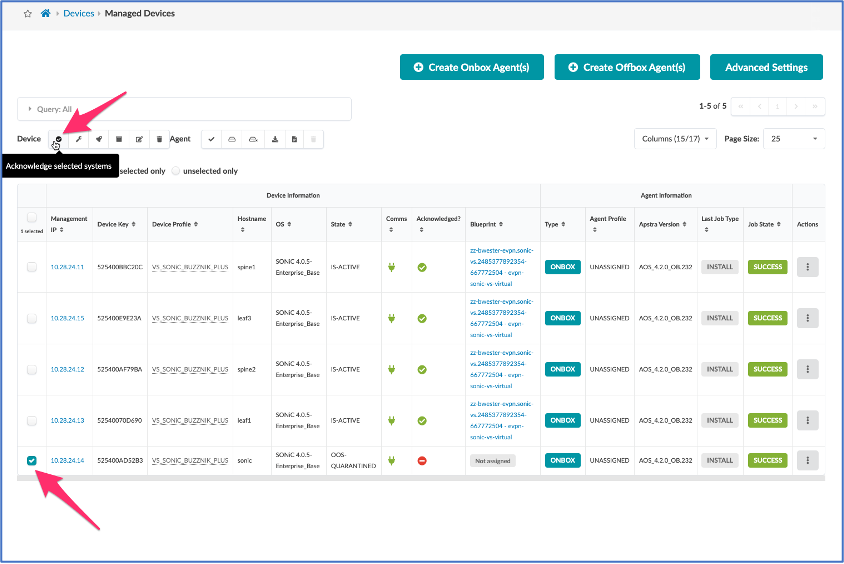
  1. Once the agent install job is complete you must acknowledge the device:
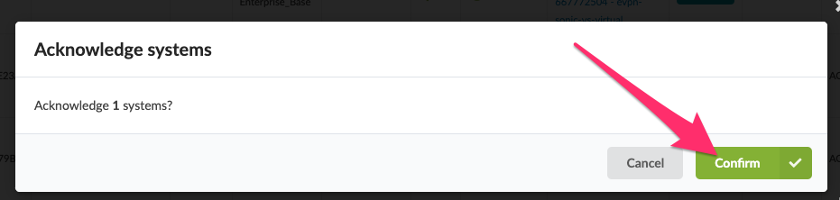
  1. Confirm the acknowledge systems dialog:
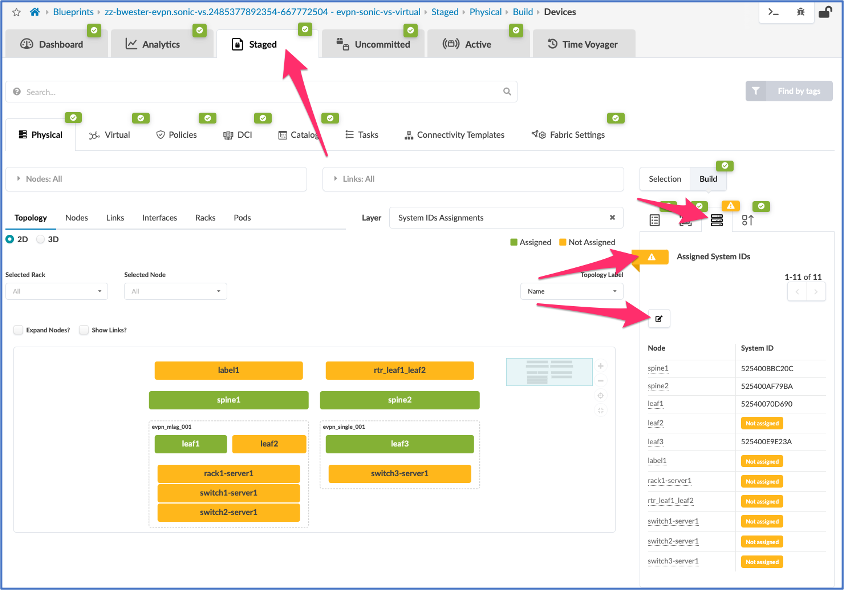
  1. Navigate to Blueprints -> BpID -> Staged -> Build -> Devices and Open "Assigned System IDs":
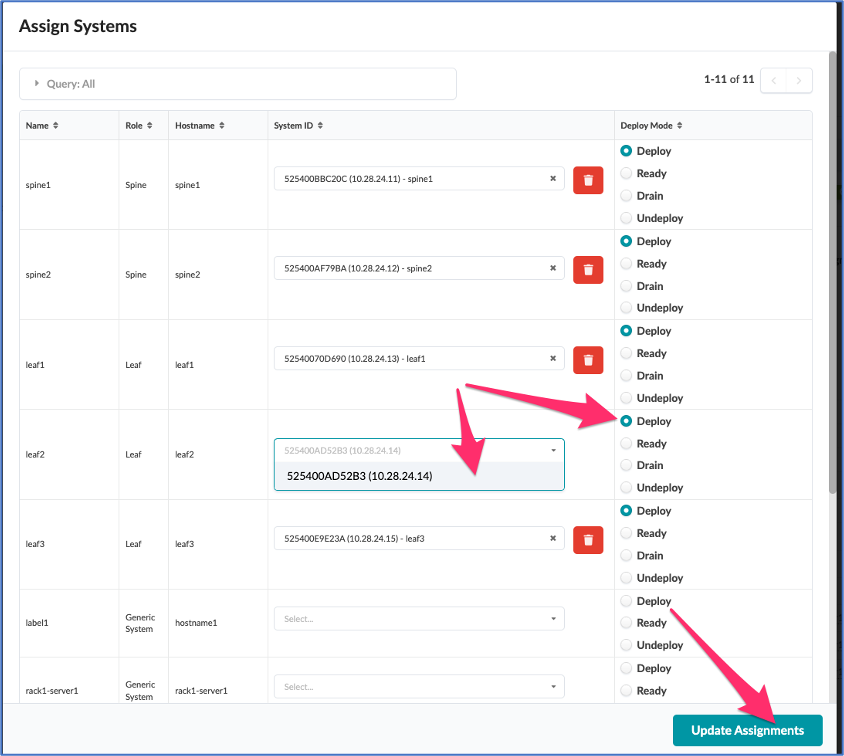
  1. Select the pencil icon and Click the dropdown next to leaf2 to select the replacement device, then click the "deploy" radio button and finally select the "Update Assignments" selector:
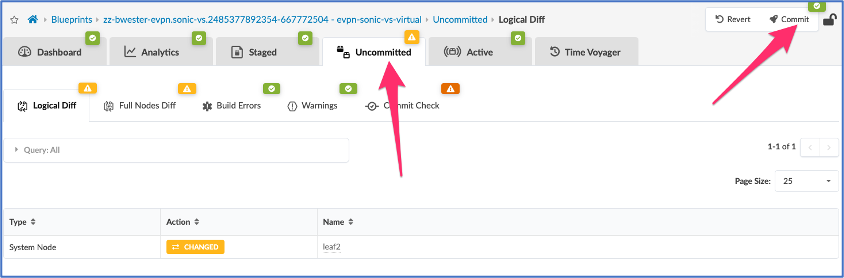
  1. Commit the change by Navigating to the Uncommitted tab, and Click the Commit "Rocket ship":
  1. Comment and confirm your commit:

  1. At this stage your deployment will take some time to stabilize and the anomalies should eventually converge and disappear.

Terraform Method to replace a device in Apstra

From a Terraform perspective, replacement of a device is fairly straightforward, and will describe that process with an example terraform configuration of a simple Blueprint:
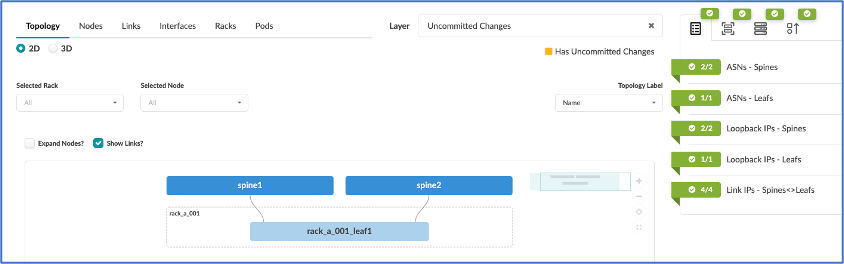
We will be replacing the device rack_a_001_leaf1.

Here is our example Terraform Configuration:

terraform {
  required_providers {
    apstra = {
      source = "Juniper/apstra"
    }
  }
}
provider "apstra" {
  url                     = "https://admin:admin@10.28.24.3:443"
  tls_validation_disabled = true
  blueprint_mutex_enabled = false
  experimental = true #New Apstra 4.2 API
}
resource "apstra_rack_type" "a_rack" {
  name  = "rack_a"
  leaf_switches = {
    leaf1 = {
      logical_device_id = "slicer-7x10⁻¹"
      spine_link_speed = "10G"
      spine_link_count = 1
    }
  }
  fabric_connectivity_design = "l3clos"
}
resource "apstra_template_rack_based" "a_template" {
  name = "template_a"
  asn_allocation_scheme = "unique"
  overlay_control_protocol = "evpn"
  spine = {
    logical_device_id = "slicer-7x10⁻¹"
    count = 2
  }
  rack_infos = {
    (apstra_rack_type.a_rack.id) = { count = 1}
  }
}
resource "apstra_datacenter_blueprint" "a_blueprint" {
  name = "blueprint_a"
  template_id = apstra_template_rack_based.a_template.id
}
resource "apstra_managed_device_ack" "spine1" {
  agent_id = "e44df49e-556b-446e-a02f-7fd23804901e"
  device_key = "525400BBC20C"
}
resource "apstra_managed_device_ack" "spine2" {
  agent_id = "b5726b1d-29ba-4ab0-ac76-5def33291cc4"
  device_key = "525400AF79BA"
}
resource "apstra_managed_device_ack" "leaf1" {
  agent_id = "8f448798-c260-46b7-b7fa-46609f0598d4"
  device_key = "525400E9E2FF"
}
resource "apstra_datacenter_device_allocation" "spine1" {
  blueprint_id = apstra_datacenter_blueprint.a_blueprint.id
  node_name = "spine1"
  device_key = apstra_managed_device_ack.spine1.device_key
  deploy_mode              = "deploy"
}
resource "apstra_datacenter_device_allocation" "spine2" {
  blueprint_id = apstra_datacenter_blueprint.a_blueprint.id
  node_name = "spine2"
  device_key = apstra_managed_device_ack.spine2.device_key
  deploy_mode              = "deploy"
}
resource "apstra_datacenter_device_allocation" "leaf1" {
  blueprint_id = apstra_datacenter_blueprint.a_blueprint.id
  node_name = "rack_a_001_leaf1"
  device_key = apstra_managed_device_ack.leaf1.device_key
  deploy_mode              = "deploy"
}

As you can see this is a very simple Terraform configuration.

We assume the terraform configuration is applied to the Apstra server, and all of the Resources for the blueprint are Allocated and Committed.

Steps needed to replace a device using the Terraform Workflow:

  1. Remove the resource for the device from the Terrform configuration, in this case we will be removing the following and applying the configuration.
1
2
3
4
5
6
    resource "apstra_datacenter_device_allocation" "leaf1" {
    blueprint_id = apstra_datacenter_blueprint.a_blueprint.id
    node_name = "rack_a_001_leaf1"
    device_key = apstra_managed_device_ack.leaf1.device_key
    deploy_mode              = "deploy"
    }

By removing this configuration and terraform apply we remove the rack_a_001_leaf1 from the blueprint and prepare it for removal from Managed Devices. You cannot remove a device from Apstra without first removing it from the Appropriate Blueprint.

Here is the result of the terraform apply

  bwester@bwester-mbp terraform % terraform apply
    apstra_datacenter_device_allocation.leaf1: Refreshing state...
    apstra_managed_device_ack.spine2: Refreshing state...
    apstra_managed_device_ack.leaf1: Refreshing state...
    apstra_managed_device_ack.spine1: Refreshing state...
    apstra_rack_type.a_rack: Refreshing state... [id=wjdosvpvs8qdkyecs2slrw]
    apstra_template_rack_based.a_template: Refreshing state... [id=3fcd246d-f7eb-4850-ba18-bd8429aa3c8d]
    apstra_datacenter_blueprint.a_blueprint: Refreshing state... [id=9c2404f6-a875-4d29-9add-919601601b04]
    apstra_datacenter_device_allocation.spine2: Refreshing state...
    apstra_datacenter_device_allocation.spine1: Refreshing state...

    Terraform used the selected providers to generate the following execution plan. Resource actions are indicated with the following symbols:
      - destroy

    Terraform will perform the following actions:

      # apstra_datacenter_device_allocation.leaf1 will be destroyed
      # (because apstra_datacenter_device_allocation.leaf1 is not in configuration)
      - resource "apstra_datacenter_device_allocation" "leaf1" {
          - blueprint_id             = "9c2404f6-a875-4d29-9add-919601601b04" -> null
          - deploy_mode              = "deploy" -> null
          - device_key               = "525400E9E23A" -> null
          - device_profile_node_id   = "sfBQVnyC5MBMtWoYLpU" -> null
          - initial_interface_map_id = "VS_SONiC_BUZZNIK_PLUS__slicer-7x10⁻¹" -> null
          - interface_map_name       = "VS_SONiC_BUZZNIK_PLUS__slicer-7x10⁻¹" -> null
          - node_id                  = "v4U3_ek6bH3t_ppYEXA" -> null
          - node_name                = "rack_a_001_leaf1" -> null
        }

    Plan: 0 to add, 0 to change, 1 to destroy.

    Do you want to perform these actions?
      Terraform will perform the actions described above.
      Only 'yes' will be accepted to approve.

      Enter a value: yes

    apstra_datacenter_device_allocation.leaf1: Destroying...
    apstra_datacenter_device_allocation.leaf1: Destruction complete after 4s

    Apply complete! Resources: 0 added, 0 changed, 1 destroyed.
  1. Once this step is complete you will need to commit the blueprint changes.

  2. We now will update the terraform configuration with the new information for the replacement device. The specific area of the Terraform configuration we are interested in is the following snippet:

1
2
3
4
resource "apstra_managed_device_ack" "leaf1" {
  agent_id = "8f448798-c260-46b7-b7fa-46609f0598d4"
  device_key = "525400E9E2FF"
}

Replace the device_key with the new Key value. Replace the agent_id with the new Agent ID value. This value can be derived from navigating to the UI via Devices -> Managed Devices -> device ip -> Device Copy the encoded Device Key and AgentID from the URL string.
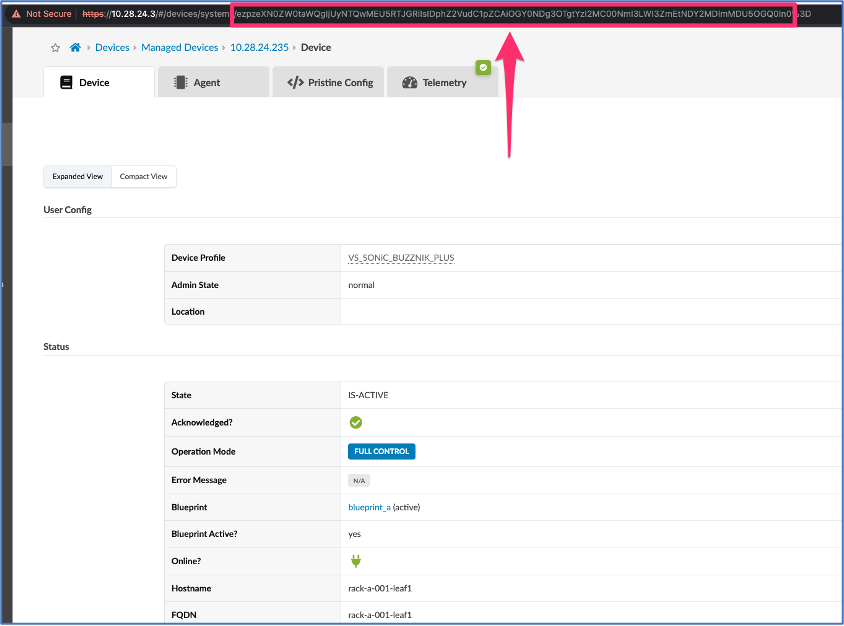
Base64 Decode the information:

 pbpaste | base64 --decode 
    {:system-id "525400E9E2FF", :agent-id "8f448798-c260-46b7-b7fa-46609f0598d4%

You can also derive the agent-id from a data source, or from swagger, or from the terraform resource which created it.

  1. Once you have replaced the information into the terraform configuration, apply the new Terraform.
bwester@bwester-mbp terraform % terraform apply           
    apstra_managed_device_ack.spine1: Refreshing state...
    apstra_managed_device_ack.spine2: Refreshing state...
    apstra_rack_type.a_rack: Refreshing state... [id=wjdosvpvs8qdkyecs2slrw]
    apstra_template_rack_based.a_template: Refreshing state... [id=3fcd246d-f7eb-4850-ba18-bd8429aa3c8d]
    apstra_datacenter_blueprint.a_blueprint: Refreshing state... [id=9c2404f6-a875-4d29-9add-919601601b04]
    apstra_datacenter_device_allocation.spine2: Refreshing state...
    apstra_datacenter_device_allocation.spine1: Refreshing state...

    Terraform used the selected providers to generate the following execution plan. Resource actions are indicated with the following symbols:
      + create

    Terraform will perform the following actions:

      # apstra_datacenter_device_allocation.leaf1 will be created
      + resource "apstra_datacenter_device_allocation" "leaf1" {
          + blueprint_id             = "9c2404f6-a875-4d29-9add-919601601b04"
          + deploy_mode              = "deploy"
          + device_key               = "525400E9E2FF"
          + device_profile_node_id   = (known after apply)
          + initial_interface_map_id = (known after apply)
          + interface_map_name       = (known after apply)
          + node_id                  = (known after apply)
          + node_name                = "rack_a_001_leaf1"
        }

      # apstra_managed_device_ack.leaf1 will be created
      + resource "apstra_managed_device_ack" "leaf1" {
          + agent_id   = "8f448798-c260-46b7-b7fa-46609f0598d4"
          + device_key = "525400E9E2FF"
          + system_id  = (known after apply)
        }

    Plan: 2 to add, 0 to change, 0 to destroy.

    Do you want to perform these actions?
      Terraform will perform the actions described above.
      Only 'yes' will be accepted to approve.

      Enter a value: yes

    apstra_managed_device_ack.leaf1: Creating...
    apstra_managed_device_ack.leaf1: Creation complete after 1s
    apstra_datacenter_device_allocation.leaf1: Creating...
    apstra_datacenter_device_allocation.leaf1: Creation complete after 7s

    Apply complete! Resources: 2 added, 0 changed, 0 destroyed.

Now that you have changed the system you will need to commit the changes to Apstra.

In these examples, we did all of the work to clean any existing configuration from the new device, boot the device, and Install the Apstra Agent on the device. For Example in the SONIC use case, you may be required to remove any existing configuration from the device, here is an example:

1
2
3
    root@sonic:/home/admin# rm /etc/sonic/config_db.json
    root@sonic:/home/admin#  config-setup factory
    root@sonic:/home/admin# reboot

Conclusion

Device replacement in Apstra is a straightforward, easy process. This article demonstrates two methodologies: replacement in the Apstra UI, and replacement using Terraform.

Acknowledgements

Thanks to Jeff Doyle for the review and polishing of this article.