Examples and scenarios
Creating virtual network(s), containers and interactive sessions
-
Via Contrail WebUI (
https://CONTROLLER_IP:8143):-
Create a networking policy (Configuration->Networking->Policies) with the following rule:
pass protocol any network any ports any <> network any ports any

-
Create virtual network called
testnet1with single subnet:10.0.1.0/24. Leave every field as default except IP pool (set it to be from10.0.1.10to10.0.1.100) and network policy (set it to policy created in first step).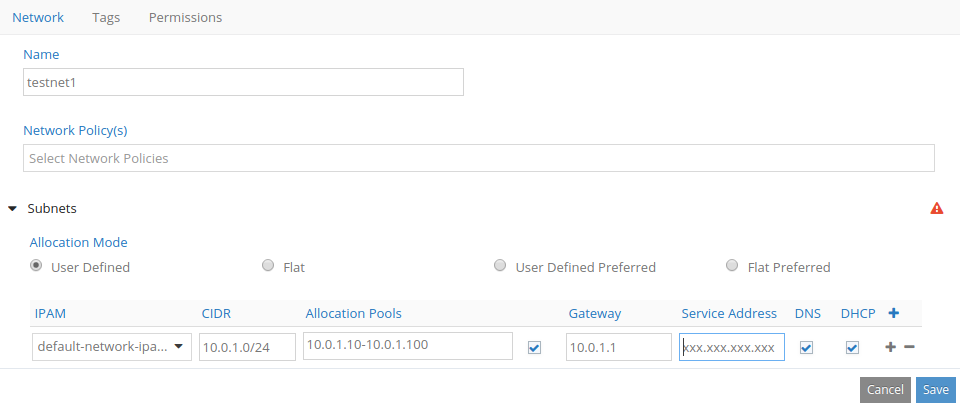
-
Create virtual network called
testnet2with single subnet:10.0.2.0/24. Leave every field as default except IP pool (set it to be from10.0.2.10to10.0.2.100) and network policy (set it to policy created in first step).
-
-
On both Windows VMs:
-
Verify if Agent service is running:
Get-Service ContrailAgentState should be Running
-
Verify if VMSwitch Extension is running and enabled:
Get-VMSwitch -Name "Layered*" | Get-VMSwitchExtensionFind block of data describing to
vRouter
Both Enabled and Running fields should be True -
Verify if CNM plugin service is running:
Get-Service contrail-cnm-pluginState should be Running 1. Create docker network
testnet1on the 1st Windows compute code:docker network create --ipam-driver windows -d Contrail --opt tenant=admin --opt network=testnet1 testnet1 -
Run a docker container in the prepared network on the 1st Windows compute node:
docker run -id --network testnet1 --name container1 microsoft/windowsservercore powershellNote: docker will pull heavy images from dockerhub and it may take a while. You can start configuration of another Windows compute node in the meantime.
-
Inspect container1 on the 1st Windows compute node. Find the part that describes endpoints and verify that it has a correct IP address assigned (from the previously configured IP pool).
docker inspect container1 -
Run interactive shell inside the container1 on the 1st Windows compute node:
docker exec -it container1 powershell -
Create docker network ‘testnet2’ on the 2nd Windows compute node:
docker network create --ipam-driver windows -d Contrail --opt tenant=admin --opt network=testnet2 testnet2 -
Run a docker container in the prepared network (‘testnet2’) on the 2nd Windows compute node:
docker run -id --network testnet2 --name container2 microsoft/windowsservercore powershell -
Inspect container2 on 2nd Windows compute node. Find the part that describes endpoints and verify that it has a correct IP address assigned (from the previously configured IP pool).
docker inspect container2 -
Run a 2nd docker container in the prepared network (‘testnet2’) on the 2nd Windows compute node:
docker run -id --network testnet2 --name container3 microsoft/iis powershell -
Inspect container3 on the 2nd Windows compute node. Find the part that describes endpoints and verify that it has a correct IP address assigned (from the previously configured IP pool).
docker inspect container3 -
Run interactive shell inside the container2 on the 2nd Windows compute node:
docker exec -it container2 powershell -
Run interactive shell inside the container3 on the 2nd Windows compute node. Remember that Powershell console that has been used in previous step is now running a session in container2. To operate on a host system, open new Powershell console.
docker exec -it container3 powershell
-
ICMP
-
Verify that ICMP protocol works within single virtual network.
To do that invoke the following Powershell command in interactive session of container2 (on the 2nd Windows compute Node):ping <IP address of container3> -
Verify that ICMP protocol works across virtual network boundaries.
To do that invoke the following Powershell command in interactive session of container1 (on the 1st Windows Compute Node):ping <IP address of container2>
TCP
-
Invoke the following commands in container3’s interactive session (on the 2nd Windows Compute Node):
cd \inetpub\wwwroot echo "We come in peace." >> index.html -
Invoke the following command in container1’s interactive session (on the 1st Windows Compute Node). Verify that you receive server response with webpage prepared in previous step.
Invoke-WebRequest http://<container3's IP address> -UseBasicParsing
UDP
-
Set up UDP listener on container3 (on the 2nd Windows Compute Node).
To do that invoke the following commands in container3’s interactive console. Last instruction is a blocking call waiting for incoming packet.$RemoteIPEndpoint = New-Object System.Net.IPEndPoint([IPAddress]::Any, 0) $UDPRcvSocket = New-Object System.Net.Sockets.UdpClient 3000 $Payload = $UDPRcvSocket.Receive([ref]$RemoteIPEndpoint) -
Send UDP packet from container1 (on the 1st Windows Compute Node).
To do that invoke the following commands in container1’s interactive console.$ListenerAddress = New-Object System.Net.IPEndPoint([IPAddress]::Parse("10.0.2.4"), 3000) $UDPSenderSocket = New-Object System.Net.Sockets.UdpClient 0 $Payload = [Text.Encoding]::UTF8.GetBytes("We come in peace.") $UDPSenderSocket.Send($Payload, $Payload.Length, $ListenerAddress) -
When packet is received by container3, blocking call to
System.Net.Sockets.UdpClient.Receive(in container3 on the 2nd Windows Compute Node) is going to return. If that doesn’t happen immediately, repeat invocation of$UDPSenderSocket.Send(in container1 on the 1st Windows Compute Node). -
Invoke the following command in container1’s interactive session to display payload of received UDP packet to verify that it’s consisted with sent message:
[Text.Encoding]::UTF8.GetString($Payload)
Network policies and security groups
- Create additional policies and security groups (through WebUI) with various settings and demonstrate that they affect communication between networks. One may follow ICMP/TCP/UDP test procedures with various policies and security groups.
- Revert network configuration (policies and security groups) to its original state not to affect other experiments.
ECMP
- Create Floating IP Pool through Contrail WebUI assigned to
testnet2. - Create Floating IP through WebUI. Assign it to previously created pool and set specific IP that is a correct address in
testnet2(e.g. 10.0.2.101). - Assign Floating IP created in second step to port (
Portstab) that belongs to container2. - Assign Floating IP created in second step to port (
Portstab) that belongs to container3. -
Set up an UDP listener on container2. Enter the following Powershell instructions in interactive console of container2 on the 2nd Windows Compute Node:
$Sock = [System.Net.Sockets.UdpClient]::new(5000) $Endpoint = [System.Net.IPEndPoint]::new([IPAddress]::Any, 5000) while ($True) { $Data = $Sock.Receive([ref]$Endpoint) Write-Host "Received packet from $Endpoint" } -
Set up an UDP listener on container3. Enter the following Powershell instructions in interactive console of container3 on the 2nd Windows Compute Node:
$Sock = [System.Net.Sockets.UdpClient]::new(5000) $Endpoint = [System.Net.IPEndPoint]::new([IPAddress]::Any, 5000) while ($True) { $Data = $Sock.Receive([ref]$Endpoint) Write-Host "Received packet from $Endpoint" } -
Send multiple UDP packets from container1 on the 1st Windows Compute Node. Use different source ports. Set the floating IP (created in step 2) as destination address. Use 5000 (as used in step 6) as destination port.
Then verify that some packets were received by container2 while some other packets were received by container3. Receiving container is going to display a message:Received packet from <sender address>.
Use the following Powershell command to send 10 UDP packets from various source ports:1..100 | % { $s = [System.Net.Sockets.UdpClient]::new(10000+$_) $s.Send("C".ToCharArray(), 1, "10.0.2.101", 5000) }